B4LL Application - Settings
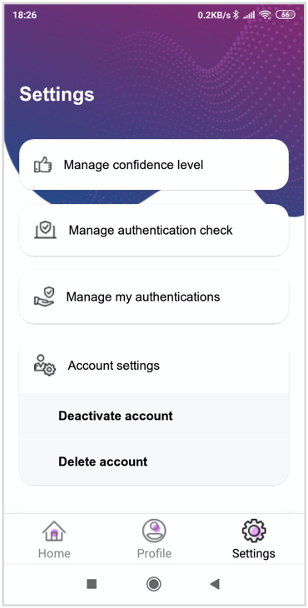
- The applications settings can be accessed via the “Settings” menu on the bottom navigation of the application.
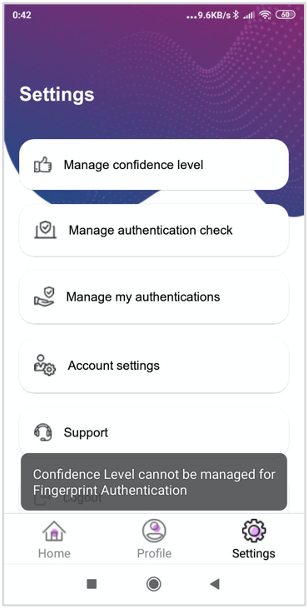
- The settings menu provides certain options to increase the application’s security and offers options to exercise control over your biometric data.
Manage confidence level
note
Note: Confidence level can be modified only for Voice and Face authentication options.
- Click on Manage confidence level option on the Settings menu.
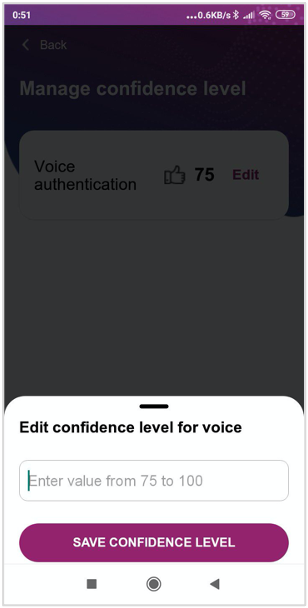
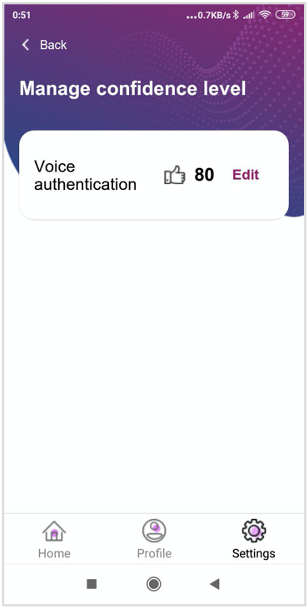
- You will be displayed with your enrolled biometric options. By default voice authentication will have the confidence level set at 87% and face authentication will have the confidence level set at 75%. This can be increased upto 100% to increase the authentication security.
- Click on Edit to change the defined Confidence Level.

- If you don't have either voice or face recognition enrolled, on clicking the Manage confidence level option, you will be displayed with a toast message “Confidence level cannot be managed for fingerprint authentication”.
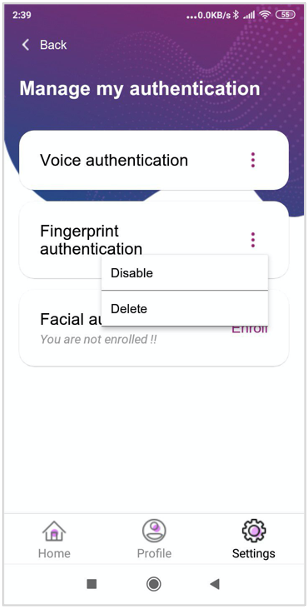
Manage my authentications
You can enroll for multiple biometric options as well as disable/delete any enrolled biometric option. In addition, you can also enroll multiple passphrases for voice recognition so that you would be displayed with any random enrolled passphrase for voice authentication. These features increase the security of the application.
Enroll to a biometric option
- Click on Manage my authentication menu within Settings menu
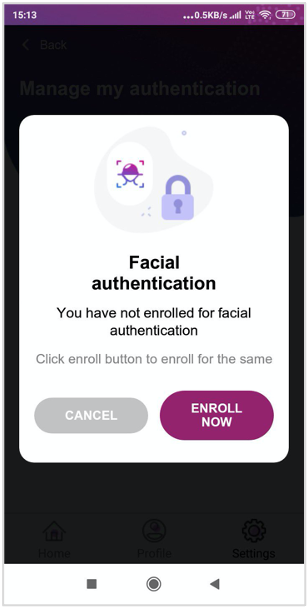
- The enrolled biometric options will have a wedge icon next to them whereas un-enrolled biometric options will have an italicized text displayed underneath them “You are not enrolled !!” with an option to “Enroll”.
- On clicking “Enroll”, you will be shown a pop-up message indicating that the option is currently un-enrolled. Click on the “Enroll now” button on the pop-up to continue the enrollment process.
- You will now be navigated to the enrollment process similar to that of the registration process.
- On successful enrollment of the selected biometric option, the enrollment will be reflected in your account and you will now be able to use that biometric option for any authentication.

Manage Passphrases
note
Note: This feature can be used only if voice recognition is enabled
Enroll additional passphrase
- You can increase the security of your voice authentication by opting to enroll for multiple passphrases.
- Click on Manage my authentication menu within the Settings menu.
- Click on the wedge icon next to the Voice authentication option.
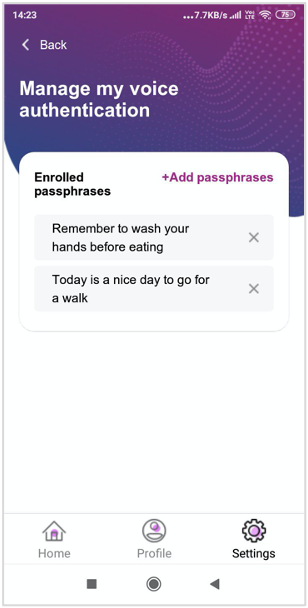
- Select the Manage passphrases option.

- You will now be displayed with the list of enrolled passphrases.
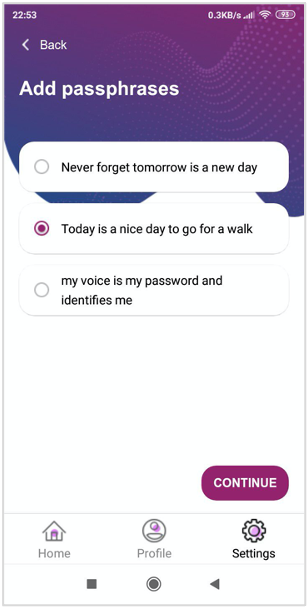
- Click on the Add passphrase option available on the screen.

- A list of available passphrases that you have not yet enrolled with will be shown.
- Choose any one passphrase to enroll.
- Click the Continue button to continue the enrollment process.
- You will now be navigated to the voice recording screen similar to that of the voice registration process. The process of enrollment is the same to that of the voice registration process.
- Once the additional passphrase is successfully enrolled, your account will be updated with the additional passphrase.
- During voice authentication, the application would display any random enrolled passphrase.
Disable Biometric Recognition
note
Note: If you have only one biometric option enrolled, you will not be able to disable that biometric option
- You can disable any biometric option temporarily provided you have another active biometric option enabled.
- Click on “Manage my authentication” menu within the Settings menu
- The enrolled biometric options have a wedge icon which provides the options to control the settings of the biometric.
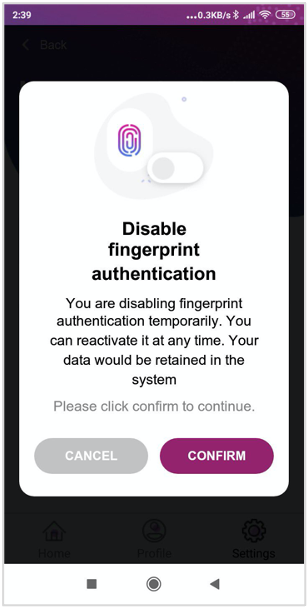
- Click on the “Disable” option in the dropdown to disable the biometric option.
- On clicking the “Disable” option, you will be shown a pop-up message indicating the data retention. Click on the “Confirm” button on the pop-up to continue the disable process.
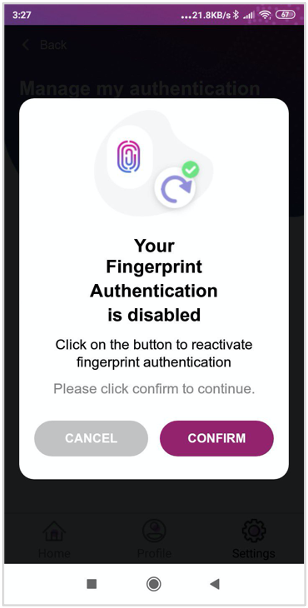
- On confirmation, the biometric option would be disabled.

Enable biometric recognition
- You can enable any biometric option that you may have disabled.
- Click on “Manage my authentication” within Settings menu
- Click on the wedge icon next to the enrolled biometric option.
- Click on the “Enable” option in the dropdown to enable the biometric option.
- You will be shown a pop-up message confirming the reactivation of the biometric option. Click on the “Confirm” button to continue the reactivation process.
- On confirmation, the biometric option would be reactivated and would be available for authentication.

Delete biometric recognition
note
Note: If you have only one biometric option enrolled, you will not be able to delete that biometric option
- You can delete any biometric option provided you have another active biometric option enabled.
- Click on “Manage my authentication” menu within Settings menu
- The enrolled biometric options have a wedge icon which provides the options to control the settings of the biometric.
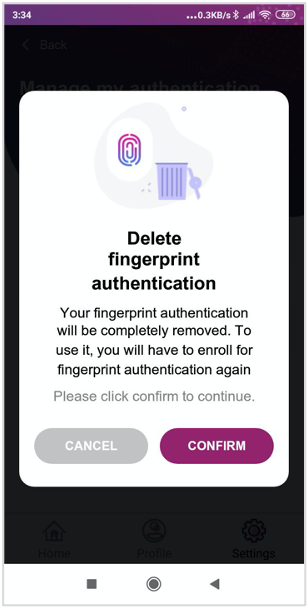
- Click on the “Delete” option in the dropdown to delete the biometric option.
- On clicking the “Delete” option, you will be shown a pop-up message indicating that the data would be removed from the system. Click on the “Confirm” button on the pop-up to continue the delete process.
- On confirmation, the biometric option would be deleted.
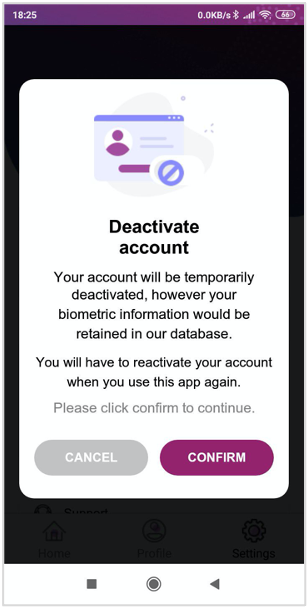
Deactivate account
- You can temporarily deactivate your account.
- Click on “Account” settings within the Settings menu.
- Click on the “Deactivate” option in the dropdown.
- You will be shown a pop-up message indicating that the data would be retained in the system. Click on the “Confirm” button on the pop-up to continue the account deactivation process.
- On successful account deactivation, you will be navigated back to the registration screen

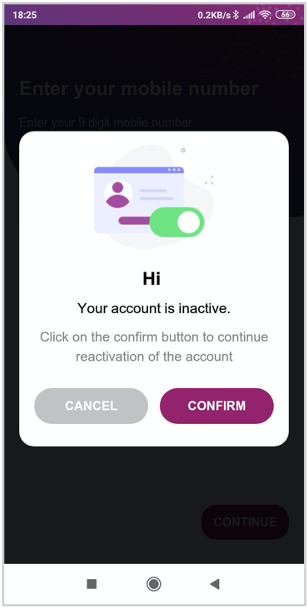
Reactivate account
- You can reactivate your account if it is temporarily deactivated.
- Enter your registered mobile number.
- The application will validate your mobile number.
- You would be displayed a pop-up message stating that your account is “Inactive” and would you like to activate the same.
- Click on Confirm button on the pop-up to continue the reactivation process
- You would be shown your active enrolled biometric options to validate your account.
- Once authenticated, your account would be activated and you would be navigated to the home screen.
Delete account
- You can delete your account if you no longer need to use the application and all your biometric options would also be removed.
- Click on “Account” menu within Settings menu
- Click on the “Delete” option in the dropdown to delete your account.
- On clicking the “Delete” option, you will be shown a pop-up message indicating that the data would be removed from the system. Click on the “Confirm” button on the pop-up to continue the account delete process.
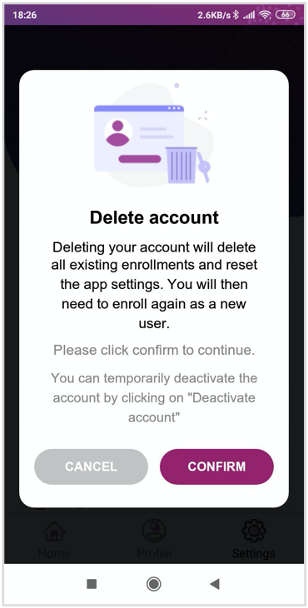
- On successful account deletion, you will be navigated back to the registration screen.